Hello, my crafty friends and welcome to my blog.
SNEAK PEEK! I am using products from the Jan-Apr 2023 Mini Catalogue. As a demonstrator, I am able to order select products early so that I may show you what is coming. Sign up and you can these too.
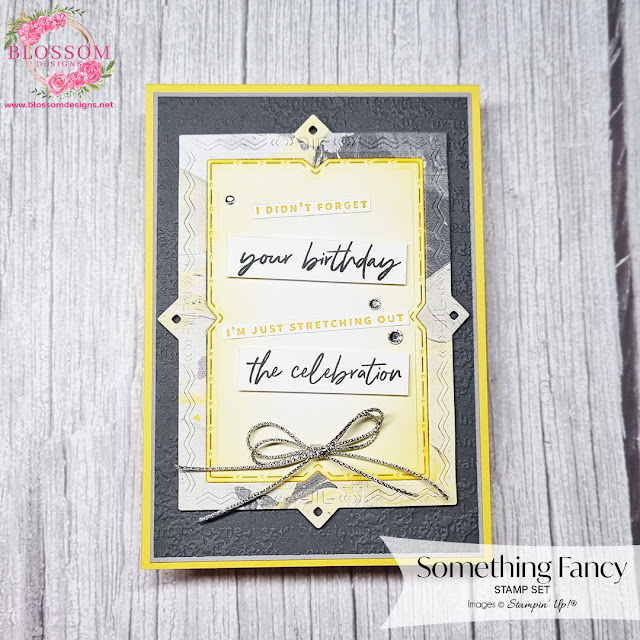
While the title of this post says, "Something Fancy", it's not the only product featured in this card today. I went a bit wild! 😁 Do you always stick to the products in a Suite or a Bundle? I generally do, but depending on the stamp for example, I'll grab other products. The Something Fancy stamp set is only sentiments, and the coordinating dies are perfect, but I really wanted to incorporate the DSP and those small dies just wouldn't do.
How do you start when you make a card? Is it with the stamp set or maybe a colour combo? It is never the same thing for me and with this card, it started with the DSP. Then came the dies (Desert Details Dies), then the stamp set. I then had to throw in the Timeworn Type 3D embossing folder too. Just for good measure! 😁
Did you notice that my card base is NOT white?! Are you surprised? I am. 😁 But white didn't really work with these colours today. As I said, I started with the DSP (Fancy Flora - 6" x 6") from the Fancy Flora Suite of products. I am not usually drawn to yellow (you know I am a pink girl) but I couldn't resist the Daffodil Delight sheet so that was my starting point. I had all my new goodies sitting on my desk (I like to put magnetic sheets under the dies as I find it easier to pick the dies up off the sheet rather than the double-sided tape they are placed on) and thought I could cut out the frame from Desert Details Dies with the DSP. I grabbed some Basic Gray cardstock and started adding layers until I was happy with the combination. As you can see, I embossed the Basic Gray layer as I felt it was too plain without some texture.
The stamp set I stamped in Basic Gray and also So Saffron (what!) by accident. I thought I had grabbed Daffodil Delight (I was creating at night and white font on top of yellow is hard to see at the best of times), but I didn't, so I stamped away without realising but I think it worked out ok. I cut out each line and used alternate colours for each line. I die cut the other frame (yes, there are two) in Basic White, but it was too stark, so I used my blending brush and So Saffron ink pad and went around the outside. I raised both frames using dimensionals and also the Basic Gray lines of the sentiment. I added a double bow using the Simply Elegant Trim in silver.
I again used the DSP with the border die from Desert Details for the inside. I always forget to show the inside on my blog.
**As the new products aren't available until January, I cannot link them below. I have linked everything else that is current**
Card Measurements: Imperial
Base card - Daffodil Delight = 4 1/4" x 11" (score @ 5 1/2")
Layer 1 - Smoky Slate = 4" x 5 1/4"
Layer 2 - Basic Gray = 3 7/8" x 5 1/8"
Base card - Daffodil Delight = 4 1/4" x 11" (score @ 5 1/2")
Layer 1 - Smoky Slate = 4" x 5 1/4"
Layer 2 - Basic Gray = 3 7/8" x 5 1/8"
Basic White scrap: sentiment
Card Measurements: Metric
Base card - Daffodil Delight = 10.5cm x 29.7cm (score @ 14.9cm)
Layer 1 - Smoky Slate = 10cm x 14.4cm
Layer 2 - Basic Gray = 9.7cm x 14.1cm
Card Measurements: Metric
Base card - Daffodil Delight = 10.5cm x 29.7cm (score @ 14.9cm)
Layer 1 - Smoky Slate = 10cm x 14.4cm
Layer 2 - Basic Gray = 9.7cm x 14.1cm
Basic White scrap: sentiment
I hope you like today's project. If you have any questions, let me know.
Purchase From My Online Store
* Click 'Add All to Cart' button below, then
deselect the items you don't require *
Enter Host Code at the checkout in my online store to receive a FREE GIFT when you spend between $40-$168! Are you spending more? Purchase a Starter Kit and get $235 worth of product for just $169! 💗
Thanks for visiting, stay safe and have a great day.
Happy Crafting,
Happy Crafting,


.png)


No comments:
Post a Comment
Thanks for taking the time to read my blog. Please feel free to leave me a message. Happy stamping!